Jupyter Hub
Jupyter Status
Released and accessible to all HPC Users at the correct URLs.
Jupyter Overview
The Jupyter Enterprise Gateway is a multi-user environment for Jupyter Notebooks. DeepThought has integrated the Jupyter Gateway to allow users to run jobs on the cluster via the native Web Interface.
If you have access to the HPC, you automatically have access to the Jupyter Lab. You can the JupyterLab Instance via the following Jupyter URL or manually via https://deepweb.flinders.edu.au/jupyter. Your credentials are the the same as the HPC, your FAN and password.
If you are a student with access to the HPC, the above URLs may work - the URL http://deepteachweb.flinders.edu.au/jupyter is guaranteed to work correctly.
Using Conda Environments in Jupyter Hub
You can use your own custom environment in a Jupyter Kernel. There are some restrictions on python versions that must be adhered to for this integration to work correctly. You will also need to install some specific packages. This process of enabling a Conda environment to work with the HPC, SLURM and Jupyter Hub is detailed below.
Python Version Restrictions
Python Version <= 3.9.
Python 3.10 will not work, due to dependency incompatibility. Specifically, there was a change in the PyCrypto and HTML packages.
Conda Environment Preparation
If you have not performed an initial
conda init bash, issuemodule load Miniconda3followed byconda init bash, the log-out and log-in the HPC.Ensure you have a named Conda environment that is loadable by
conda activate <ENVIRONMENT_NAME>Ensure that the python version used by the environment is Python 3.9 or less.’
Log onto the HPC via SSH and activate your Conda environment
conda activate <ENVIRONMENT_NAME>(You can also use the JupyterHub ‘Terminal’ to do this)- Execute the following commands:
python3 -m pip install cm-jupyter-eg-kernel-wlm bash-kernelconda install ipython ipython_genutils
Log into Jupyter Hub with your FAN and password at the Jupyter URL
Using the bar on the Left-hand side, select small green symbol
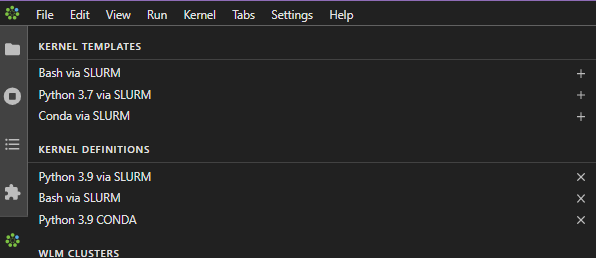
Create a new Kernel based on the ‘CONDA via SLURM’ template. a. Ensure you select any additional modules you need, like GDAL b. Ensure that you select the correct Conda environment to initialise
Use the Kernel in your Jupyter Notebooks
For Reference, the below image shows the Kernel Template Screen.
Additional Troubleshooting Steps
If you get it wrong, the integration will be mangled for all of your Conda Environments, and will not work correctly.
If you still get a HTTP 599 or 500 errors on job launch, then perform the following:
Activate your conda environment
python --versionandpython3 --versionThey MUST be 3.9 or less.
- Start a Python Interpreter Session via
python3 Attempt to load the Bash-kernel module
from bash_kernel.kernel import BashKernelNo Error Messages
- Start a Python Interpreter Session via
- Force a re-installation of the Bash Kerlel Layer
python3 -m pip install --user --upgrade --force-reinstall bash-kernel
- If you are Submitting to short, and did not change the max runtime of the Kernel it wil also not work. This is usually pin-pointanable by an IMMEDIATE error, without any type of delay.
The Default Runtime is set to
1-0, which is 24 Hours. Short has a maxiumum of 12 HoursTo Fix this, delete the Kernel Template, and recreate it wil a valid runtime (and resource specification).
12:00:00is the maximum amount possibe against short
Tensorflow / GPU Usage via Jupyter Hub
Conda Environment & Tensorflow Install
It possible to use the GPU nodes and access the GPU’s via the JupyterHub Interface. In this example, Tensorflow is used as the GPU-Enabled package of choice. To access the GPUs from your Conda environment and use Tensorflow, perform the following steps:
Follow the ‘Conda Environment Preparation’ steps up to step 4.
- Run the following commands to install Tensorflow. DO NOT use
conda install tensorflow, as it has issues with GPU detection. You must use pip. python3 -m pip install tensorflow
- Run the following commands to install Tensorflow. DO NOT use
There are a few known issues that can occur here, however the main on is solved below:
- An error about HTML has not attribute ‘parser’ or similar. This is usually resolved by upgrading pip.
python3 -m pip install --upgrade pip
Try and re-install Tensorflow as above. If it still fails, upgrade the rest of the installation tooling for python:
python3 -m pip install --upgrade setuptoolspython3 -m pip install --upgrade distlib
And once again attempt to Install Tensorflow. If you are still having issues, then reach out to deepthought@flinders.edu.au
Now that the environment is up and running, create a new Kernel Templace from the JupyterHub GUI. For CUDA access you must load the following modules. Alter the version numbers as needed.
cuda1X.X/toolkit
cuDNN
If you do not add these modules to the modules list, then you will not be able to use CUDA processing, even if you allocate yourself GPUs on the cluster.
All done! You should now be able to run the following commands from your Jupyter notebook and have Tensorflow return back GPU’s in its visible devices list and return a Tensor.
python3 -c "import tensorflow as tf; print(tf.config.list_physical_devices('GPU'))"python3 -c "import tensorflow as tf; print(tf.reduce_sum(tf.random.normal([1000, 1000])))"